Removing Trim From Kitchen Cabinets: A Comprehensive Guide
Removing trim from kitchen cabinets is a common DIY project that can significantly alter the appearance of your kitchen. Whether you're aiming for a more minimalist aesthetic or preparing for a cabinet refacing project, understanding the process is crucial for achieving a successful outcome. This article provides a comprehensive guide to removing trim from kitchen cabinets, covering essential tools, techniques, and safety considerations.
Assessing the Trim and Determining the Removal Method
Before embarking on the removal process, it's essential to assess the type of trim you're dealing with and determine the most appropriate removal method. Common types of cabinet trim include:
- Moulding: This type of trim typically consists of decorative wooden pieces that are nailed or glued to the cabinet face.
- Casing: Casing trim usually surrounds the cabinet doors and frames, creating a finished look.
- Baseboards: Baseboards are located at the bottom of the cabinets and often extend to the floor, adding a decorative touch.
The method for removing trim will depend on its attachment method. For trim attached with nails, a nail puller or hammer will be required. For glued trim, a putty knife or scraper can be used to pry it loose. If the trim is secured with staples, a staple remover or pliers will be necessary.
Gathering the Necessary Tools and Materials
Once you've assessed the trim and determined the removal method, gather the following tools and materials:
- Pry bar: For gently prying trim away from the cabinet face.
- Putty knife: For removing glue or adhesive residue.
- Hammer: For removing nails or staples.
- Nail puller: For extracting stubborn nails.
- Staple remover: For removing staples.
- Screwdriver: For removing screws if applicable.
- Safety glasses: To protect your eyes from flying debris.
- Work gloves: To protect your hands from splinters or sharp edges.
- Wood filler and putty knife: For filling nail holes or gaps left behind after removing the trim.
- Sandpaper: For smoothing out any rough edges after filling.
- Paint or stain: For touching up the cabinet faces after removing the trim.
Step-by-Step Instructions for Removing Trim from Kitchen Cabinets
Follow these steps for a safe and effective removal of trim from your kitchen cabinets:
- Prepare the Work Area: Clear the area around the cabinets to ensure ample space for working. Cover the floor with a drop cloth to protect it from scratches or spills.
- Inspect the Trim: Carefully examine the trim to determine its attachment method. Look for nails, staples, glue, or screws.
- Remove the Trim: Use a pry bar, putty knife, hammer, nail puller, or staple remover to carefully detach the trim from the cabinet face. Work slowly and gently to avoid damaging the cabinets or trim.
- Remove Adhesive: If the trim was glued on, use a putty knife to scrape off any remaining adhesive residue. Be careful not to scratch the cabinet surface.
- Fill Nail Holes: Use wood filler to fill any holes left behind after removing nails or staples. Allow the filler to dry completely before sanding it smooth.
- Clean and Touch Up: Clean the cabinet faces with a damp cloth to remove any debris or dust. Touch up any paint or stain that was removed with the trim.
Considerations for Removing Trim from Kitchen Cabinets
Before undertaking the removal project, consider the following factors:
- The age of the cabinets: Older cabinets may have fragile trim that could be easily damaged during removal.
- The condition of the trim: If the trim is cracked, chipped, or warped, it may be best to replace it rather than attempt to remove it.
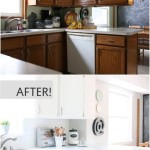
- The overall aesthetic: Removing trim can significantly alter the appearance of your kitchen. Make sure you're comfortable with the potential changes before proceeding.
Removing trim from kitchen cabinets is a relatively straightforward project that can be completed by most DIYers. By carefully following the steps outlined in this guide, you can successfully remove trim and create a new look for your kitchen. Remember to prioritize safety and use caution when working with tools and materials. With proper planning and execution, you can achieve a successful outcome and enjoy the transformed appearance of your kitchen.
.jpg?strip=all "How To Remove Decorative Cabinet Scrollwork Dream Green Diy")
How To Remove Decorative Cabinet Scrollwork Dream Green Diy
.jpg?strip=all "How To Remove Decorative Cabinet Scrollwork Dream Green Diy")
How To Remove Decorative Cabinet Scrollwork Dream Green Diy

How To Take Down Kitchen Cabinets Rehang One Young House Love
.jpg?strip=all "How To Remove Decorative Cabinet Scrollwork Dream Green Diy")
How To Remove Decorative Cabinet Scrollwork Dream Green Diy

How To Remove Kitchen Cabinets Budget Dumpster

Diy Kitchen Cabinet Upgrade With Paint And Crown Molding

How To Remove Kitchen Cabinets Budget Dumpster

Make Them Wonder How To Remove Decorative Trim From Cabinets

Make Them Wonder How To Remove Decorative Trim From Cabinets
.jpg?strip=all "How To Remove Decorative Cabinet Scrollwork Dream Green Diy")
How To Remove Decorative Cabinet Scrollwork Dream Green Diy
Related Posts