Kitchen Cabinet Refinishing with Rustoleum Paint: A Comprehensive Guide
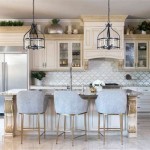
Kitchen cabinets are the heart of any kitchen. They provide storage, functionality, and a significant impact on the overall aesthetics. Over time, however, cabinets can become outdated, damaged, or simply in need of a refresh. Refinishing with Rustoleum paint is an excellent option to restore the beauty and functionality of your cabinets without the expense of a complete replacement.
Preparation: The Key to Success
Thorough preparation is essential for a successful and long-lasting refinishing project. Start by removing all cabinet doors and hardware. Clean the surfaces to be painted thoroughly using a degreaser or TSP cleaner to remove any dirt, grease, or residue that could interfere with paint adhesion.
Sanding: Creating a Smooth Base
Sanding is crucial for creating a smooth and even surface for the paint to adhere to. Use a medium-grit sandpaper (120-150) to lightly sand all surfaces to be painted, including the edges and corners. Remove any sanding dust thoroughly with a tack cloth or damp cloth.
Priming: The Foundation of a Lasting Finish
Priming is an essential step that helps the paint adhere better and prevents stains or tannins from bleeding through. Apply a coat of Rustoleum Cabinet Transformations Primer to all surfaces. Allow the primer to dry completely, following the manufacturer's instructions.
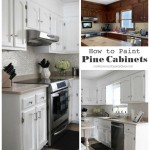
Painting: Bring Color to Your Kitchen
Now it's time to add color and transform your cabinets. Use a high-quality paintbrush or roller specifically designed for cabinetry. Apply the Rustoleum Cabinet Transformations Paint in thin, even coats, allowing each coat to dry thoroughly before applying the next.
Protection: Sealing the Deal
Once the paint has dried, seal the finish with a clear topcoat. This protects the paint from wear, scratches, and moisture. Rustoleum offers a variety of topcoats, including matte, satin, and gloss finishes. Apply the topcoat according to the manufacturer's instructions.
Hardware: The Finishing Touch
With the cabinets painted and sealed, reinstall the hardware. New hardware can add a modern or classic touch, further enhancing the updated look of your kitchen. Choose hardware that complements the paint color and overall style of your kitchen.
Tips for a Professional Finish
- Use a high-quality paintbrush or roller designed for cabinetry.
- Apply thin, even coats of paint and allow each coat to dry thoroughly.
- Sand lightly between coats to create a smooth finish.
- Use a clear topcoat to protect the paint and enhance durability.
- Reinstall hardware after the paint has dried and cured.

Rust Oleum Cabinet Transformations Light Base Satin Tub And Tile Refinishing Kit At Com

Rust Oleum Transformations Cabinet Wood Refinishing System Kit 262495 The Home Depot

Painting Kitchen Cabinets Rust Oleum Cabinet Transformations Kit Sarah S Bites

Rust Oleum Satin Dark Tint Base Cabinet Refinishing System Interior 132 Oz 1 Pack

Rustoleum Cabinet Transformations Retro Renovation

Painting Your Kitchen Cabinets You Can Do It And They Cooked Happily Ever After

Rustoleum Cabinet Transformations Apartment Progress Diy Show Off Decorating And Home Improvement Blog

Painting Kitchen Cabinets With Rustoleum Cabinet Transformations

Rust Oleum Transformations Dark Color Cabinet Kit 9 Piece 258240 The Home Depot

Kitchen Makeover With Rust Oleum S Cabinet Transformations
Related Posts