Essential Aspects of Kitchen Cabinet Crown Molding Installation
Crown molding serves as both a decorative and functional element in kitchen cabinet design, providing a sophisticated touch while concealing any gaps between cabinets and the ceiling. Proper installation of crown molding is crucial to ensure a seamless and professional finish. Here are some essential aspects to consider:
1. Planning and Preparation
Before initiating installation, it is imperative to meticulously plan the project. Begin by taking precise measurements of the cabinet tops and ceiling to determine the required length and quantity of crown molding. It is advisable to purchase slightly more molding than necessary to account for potential cutting errors or unforeseen circumstances.
2. Cutting the Crown Molding
Expertly cutting the crown molding is paramount for a precise fit. Utilize a miter saw set to a 45-degree angle. For inside corners, cut the ends of the molding at a 45-degree angle facing each other. For outside corners, cut the angles facing away from each other. Practice cuts on scrap pieces before attempting to cut the actual molding.
3. Joining the Cornices
To connect the crown molding at corners, employ a miter joint, ensuring the pieces fit together snugly. Apply a thin layer of wood glue to the edges and clamp them together until the glue sets. For a more secure connection, use brad nails or a pin nailer to reinforce the joint.
4. Installing the Crown Molding
Begin installing the crown molding by securing it to the cabinets first. Apply a bead of wood glue along the top edge of the cabinets and position the molding in place. Use a brad nailer or finish nails to attach the molding to the cabinets. Ensure the nails are driven at an angle to prevent splitting the wood.
Next, secure the crown molding to the ceiling by applying a bead of caulk along the backside where it meets the ceiling. Press the molding firmly into place and use a brad nailer or finish nails to secure it to the ceiling joists.
5. Finishing Touches
Once the crown molding is installed, fill any gaps or nail holes with wood filler. Sand the filled areas smooth and apply a coat of paint or stain to match the cabinets and ceiling. Allow the paint or stain to dry thoroughly before using the kitchen.
By following these essential aspects, you can successfully install kitchen cabinet crown molding, enhancing the overall aesthetic and functionality of your kitchen space.

How To Attach Crown Mouldings Frameless Cabinets Stonehaven Life

How To Attach Crown Mouldings Frameless Cabinets Stonehaven Life

How To Attach Crown Mouldings Frameless Cabinets Stonehaven Life

Crown Molding Installation Instruction

How To Install Crown Molding On Kitchen Cabinets

How To Install Crown Mouldings American Hardwood Information Center

How To Install Crown Mouldings American Hardwood Information Center

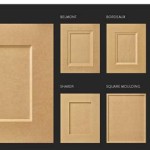
Types Of Moldings For Cabinets Com Kitchen Cabinet Crown Molding Trim

Adding Crown Molding To Kitchen Cabinets Young House Love

How Do You Install Crown Molding To Full Face Cabinets Doityourself Com Community Forums
Related Posts