Installing a Kitchen Sink Base Cabinet: A Step-by-Step Guide
The kitchen sink base cabinet is a crucial component of any kitchen, providing support and storage for the sink and its accompanying plumbing. Installing it properly is essential for the functionality and aesthetics of your kitchen. Here's a step-by-step guide to help you install a kitchen sink base cabinet.
Step 1: Prepare the Installation Area
Before you begin, clear the area where the cabinet will be installed. Remove any existing cabinets or appliances and disconnect the water supply lines. Lay down a drop cloth or plastic sheet to protect the floor from debris.
Step 2: Assemble the Cabinet
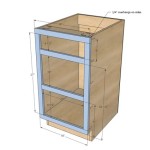
If the cabinet is not pre-assembled, follow the manufacturer's instructions to assemble it. Make sure all the parts are correctly aligned and the joints are secured. Attach the cabinet's doors and drawer fronts.
Step 3: Position the Cabinet
Move the cabinet to its desired location and center it under the planned location of the sink. Use a level to ensure the cabinet is level both front to back and side to side. Adjust the leveling legs at each corner of the cabinet to achieve the correct height.
Step 4: Secure the Cabinet
Once the cabinet is level and in place, secure it to the floor or wall studs using screws or bolts. This will prevent the cabinet from moving or shifting over time. If the cabinet is being installed in an island, it may need additional support from a framing system.
Step 5: Connect the Plumbing
Reconnect the water supply lines to the cabinet using compression fittings or flexible hoses. Ensure all the connections are tight and there are no leaks. Install the sink drain and connect it to the appropriate plumbing.
Step 6: Install the Sink
Place the sink into the cutout in the counter top and drop it into the cabinet. Secure the sink to the counter top using the provided mounting brackets or screws. Connect the drain assembly and water supply lines to the sink.
Step 7: Final Adjustments and Finishing Touches
Make final adjustments to ensure the cabinet and sink are level and plumb. Apply sealant around the edges of the sink to prevent water damage. Install any remaining cabinet hardware, such as knobs or handles.
Tips for Success:
- Use a level to ensure the cabinet is level in all directions.
- Secure the cabinet to the floor or wall studs to prevent movement.
- Connect the plumbing securely and check for leaks before installing the sink.
- Apply sealant around the sink to prevent water damage.
- If you are not confident in your DIY skills, consider hiring a professional.

How To Replace A Kitchen Sink Base Cabinet Vevano

Sink Base Units Kitchen Diy Kitchens

How To Install An Apron Sink In A Stock Cabinet Pneumatic Addict

How To Build A Farmhouse Sink Base Cabinet Houseful Of Handmade

How To Replace A Kitchen Sink Base Cabinet Vevano

How To Build A Farmhouse Sink Base Cabinet Houseful Of Handmade

Hampton Bay Shaker 36 In W X 24 D 34 5 H Assembled Sink Base Kitchen Cabinet Dove Gray Ksb36 Sdv The Home Depot

How To Replace A Kitchen Sink Base Cabinet Vevano

How To Build A Farmhouse Sink Base Cabinet Houseful Of Handmade

Base Cabinet For Farmhouse Sinks And Deep Cooktops