Installing Kitchen Cabinet Hardware: A Step-by-Step Guide for a Seamless Finish
Upgrading kitchen cabinet hardware is a cost-effective way to breathe new life into your kitchen without the expense of a full remodel. Whether you're a seasoned DIYer or a novice homeowner, installing kitchen cabinet hardware is a manageable task that can be completed with the right tools and some patience.
To ensure a professional-looking finish, follow these essential steps:
1. Gather Your Tools
* Measuring tape or ruler * Pencil or marking tool * Awl or small drill bit * Drill with drill bit appropriate for cabinet material * Phillips head or flathead screwdriver * Level (optional)2. Determine Proper Placement
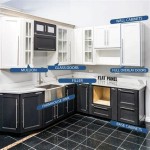
* For standard-size cabinets, the first hole should be 3 inches from the top and bottom edges. * Use a level to mark the center of each hole. * If installing knobs, the screw hole should be in the center of the knob. * For pulls, the screw holes should be spaced evenly along the base of the pull.3. Create Pilot Holes
* Use an awl or small drill bit to create pilot holes at the marked locations. * These holes prevent the cabinet material from splitting during drilling. * Drill holes deep enough to accommodate the screw length without bottoming out.4. Drill the Screw Holes
* Using the appropriate drill bit, drill the screw holes into the pilot holes. * Ensure the holes are deep enough for the screw head to sit flush against the surface.5. Install the Hardware
* Insert the screws through the holes in the hardware. * Hand-tighten the screws until snug. * Use a screwdriver to tighten the screws further, ensuring they are secure but not overtightened. * If using knobs, push them into place firmly to engage the screw threads.6. Check Alignment
* Once all the hardware is installed, check for alignment. * Use a level to ensure the pulls and knobs are level and facing in the desired direction. * If necessary, adjust the screws slightly to correct any misalignments.Additional Tips:
* For cabinets with glass or delicate surfaces, use a piece of tape underneath the drill bit to prevent scratching. * If you encounter any issues or have doubts, it's always best to consult a professional installer. * Consider the style of your kitchen and the desired functionality when choosing hardware. * Keep a consistent spacing and placement throughout the cabinets for a cohesive look.
How To Install Hardware Like A Pro Kitchen Renovation House Of Hepworths

Cabinet Hardware Installation Guide At Cabinetknob Com

How To Install Cabinet Handles Ultimate Stress Free Tips

How To Install Cabinet Handles Ultimate Stress Free Tips

How To Easily Install Kitchen Cabinet Hardware The American Patriette

How To Install Cabinet Handles Ultimate Stress Free Tips

Cabinet Hardware Placement Guide

How To Install Cabinet Door And Drawer Handles Knobs Pulls

How To Replace Kitchen Cabinet Hardware A Girl S Guide Home Diy

Cabinet Hardware Installation Tips Tricks Centered By Design
Related Posts