Installing Kitchen Cabinet Door Hinges: A Step-by-Step Guide
Installing kitchen cabinet door hinges is a relatively straightforward task that can be completed in a few simple steps. Whether you're a seasoned DIYer or a complete novice, this guide will provide you with the essential steps to ensure a successful installation.
Step 1: Determine the Hinge Type
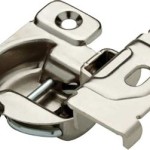
Before you begin, it's important to determine the type of hinges you'll need for your cabinets. There are three main types of hinges commonly used in kitchen cabinet construction:
- Butt hinges: These are the most common type of hinge and are suitable for most applications.
- Inset hinges: These hinges are designed to be installed within the cabinet frame and are typically concealed when the door is closed.
- Overlay hinges: These hinges are mounted on the exterior of the cabinet frame and allow the door to overlap the face frame.
Step 2: Mark the Hinge Locations
Once you've determined the hinge type, it's time to mark the locations where the hinges will be installed. Typically, two hinges are used per door, one on the top and one on the bottom. To mark the hinge locations:
- Open the cabinet door and measure 100mm from the top and bottom edges of the door.
- Transfer these measurements to the cabinet frame, aligning the marks with the edge of the door.
- Draw a faint line connecting the two marks to indicate the center of the hinge.
Step 3: Drill Pilot Holes
Before installing the hinges, it's essential to drill pilot holes to prevent the wood from splitting. To do this:
- Position the hinge over the center mark you drew earlier.
- Use a drill bit slightly smaller than the diameter of the hinge screws.
- Drill a pilot hole for each screw hole in the hinge.
Step 4: Mount the Hinges
With the pilot holes drilled, it's time to mount the hinges:
- Place the hinge over the pilot holes, aligning the screw holes.
- Insert the screws into the pilot holes and tighten them securely.
- Repeat this process for the remaining hinges.
Step 5: Adjust the Hinges
Once the hinges are mounted, you may need to adjust them to ensure the door opens and closes smoothly. To do this:
- Open and close the cabinet door several times to test its operation.
- If the door is rubbing against the cabinet frame, loosen the screws on the hinge closest to the problem area and adjust it slightly.
- Tighten the screws and retest the door.
Step 6: Install the Door
With the hinges adjusted, it's time to install the door:
- Lift the door and align it with the cabinet frame.
- Push the door into the cabinet frame until it engages with the hinges.
- Check that the door is level and square, and make any necessary adjustments.
Conclusion
Installing kitchen cabinet door hinges is a simple but important task that can greatly improve the functionality and aesthetics of your kitchen. By following these steps, you can ensure a successful installation and enjoy a beautiful and functional kitchen for years to come.

Installing Concealed Cabinet Door Hinges Handles The Easy Way

How To Install Overlay Kitchen Cabinet Hinges Roots Wings Furniture Llc

How To Install Cabinet Hinges A Step By Guide

Installing Corner Cabinet Door And Hinges

How To Install Overlay Kitchen Cabinet Hinges Roots Wings Furniture Llc

How To Fit And Adjust Kitchen Cabinet Hinges Doors

How To Adjust Your Cabinet Door Hinges Properly

How To Install Concealed Hinges The Complete Guide Kitchen Cabinets

Cabinet Doors 101 Measure Openings Install Hinges Hanging And Alignment

How To Install Cabinet Hinges A Step By Guide
Related Posts