How to Prepare Kitchen Cabinet Doors for Painting: A Comprehensive Guide
Transforming the look of your kitchen with a new coat of paint on your cabinet doors can be a rewarding DIY project. However, proper preparation is crucial to ensure a smooth and successful paint job. Here's a comprehensive guide to preparing your kitchen cabinet doors for painting:
Step 1: Remove Hardware and Fixtures
Remove all knobs, pulls, hinges, and other hardware from the cabinet doors. Label them clearly to ensure they can be easily reattached later.
Step 2: Clean the Surfaces
Use a degreaser or TSP (trisodium phosphate) solution to clean the cabinet doors thoroughly. Remove any grease, dirt, or debris that could interfere with the paint adhesion.
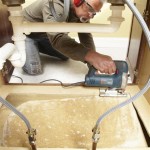
Step 3: Sand the Doors (Optional)
If the cabinet doors have a glossy finish or any imperfections, lightly sand them with fine-grit sandpaper (150-220 grit) to create a smooth surface for the paint to adhere to.
Step 4: Fill in Any Imperfections
Inspect the cabinet doors for any dents, holes, or scratches. Fill them with wood filler and allow it to dry completely. Sand the repaired areas smooth.
Step 5: Prime the Doors
Apply a primer specifically designed for kitchen cabinets. Primer helps to block stains and ensures the paint adheres properly. Apply one coat of primer and allow it to dry completely.
Step 6: Protect the Non-Paintable Areas
Use painter's tape to protect areas that you do not want to paint, such as the edges of the doors and the inside of the cabinets. Cover any exposed hinges or other hardware with masking paper.
Step 7: Sand the Primer (Optional)
Once the primer is dry, lightly sand it with fine-grit sandpaper (220-320 grit) to smooth any imperfections and create a better surface for the paint.
Step 8: Apply Paint
Choose a high-quality paint specifically formulated for kitchen cabinets. Apply two thin coats of paint, allowing each coat to dry completely before applying the next.
Step 9: Remove the Painter's Tape and Reattach Hardware
Once the paint is completely dry, carefully remove the painter's tape and reattach the hardware. Allow the paint to cure for several days before using the cabinet doors.
By following these steps, you can ensure that your kitchen cabinet doors are properly prepared for painting, resulting in a beautiful and durable finish.
How To Paint Cabinets Like A Pro Jenna Sue Design

How To Paint Kitchen Cabinets A Step By Guide Confessions Of Serial Do It Yourselfer

How To Paint Cabinets

How To Prep And Paint Kitchen Cabinets Lowe S

What You Need To Know Before Painting Cabinets The Palette Muse

Professional How To Tips For Painting Kitchen Cabinets Okeefe House Painters In Minneapolis Mn

How To Paint Laminate Cabinets Without Sanding The Palette Muse

Painting Cabinets How The Pros Do It Paper Moon

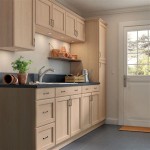
How To Paint Unfinished Cabinets Houseful Of Handmade

How To Paint Veneer Cabinets For A Long Lasting Finish Anika S Diy Life
Related Posts