The Ultimate Guide: Painting Kitchen Cabinets with Chalk
Upgrading your kitchen cabinets with a fresh coat of paint can give your kitchen an instant facelift, but when it comes to choosing the right paint, chalk paint stands out as an exceptional option. Its velvety matte finish, ease of application, and durability make it an ideal choice for kitchen cabinets.
This comprehensive guide will walk you through every step of painting kitchen cabinets with chalk paint, from prepping the cabinets to applying the finishing touches:
1. Preparing the Cabinets
Before you start painting, it's crucial to prepare the cabinets to ensure a smooth and lasting finish. This involves:
- Cleaning the cabinets thoroughly with a degreaser to remove any grease or dirt. - Removing hardware such as handles and knobs. - Sanding the cabinets lightly with fine-grit sandpaper to create a smooth surface for the paint.2. Choosing the Right Chalk Paint
Chalk paint is available in a wide range of colors and finishes. For kitchen cabinets, a satin or matte finish is recommended for durability. Choose a paint specifically designed for kitchen cabinets or furniture painting.
3. Applying the First Coat
Stir the paint thoroughly and apply a thin, even coat using a brush or roller. Start from the edges and work your way towards the center. Allow the first coat to dry completely before applying the second coat.
4. Applying the Second Coat
Once the first coat is dry, apply a second coat in the same manner. Pay attention to corners and edges to ensure complete coverage. Allow the second coat to dry completely before distressing (optional) or sealing.
5. Distressing (Optional)
Distressing creates a vintage or antiqued look. Once the paint is dry, use a fine-grit sandpaper or steel wool to gently sand areas where natural wear and tear would occur, such as corners and edges.
6. Sealing the Cabinets
Sealing the cabinets protects the paint from wear and tear. Choose a clear wax or polyurethane finish. Apply the sealant evenly and allow it to dry completely. Once dry, buff the cabinets with a soft cloth to enhance the sheen.
7. Finishing Touches
Once the cabinets are sealed, reattach the hardware and add any decorative accents. Step back and admire your newly transformed kitchen cabinets!
Remember to follow the manufacturer's instructions carefully for the specific paint and sealant products you choose. With proper preparation and execution, painting kitchen cabinets with chalk paint is a straightforward and rewarding project that will refresh your kitchen and give it a new lease on life.

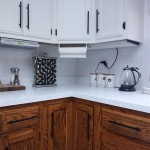
Painting Kitchen Cabinets With Chalk Paint Simply Today Life

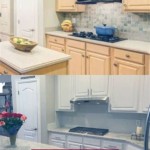
Chalk Painted Kitchen Cabinets 2 Years Later Our Storied Home

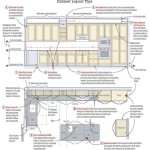
How To Paint A Kitchen With Chalk Maison De Pax

Chalk Painted Kitchen Cabinets 2 Years Later Our Storied Home

Why I Repainted My Chalk Painted Cabinets Sincerely Sara D Home Decor Diy Projects

Painting Kitchen Cabinets With Chalk Paint Simply Today Life

How To Paint Kitchen Cabinets White Let S Furniture

How 500 And Some Chalk Paint Totally Transformed This Kitchen

Step By Kitchen Cabinet Painting With Annie Sloan Chalk Paint Jeanne Oliver

Paint Your Kitchen Cabinets With Chalkboard Overalls Sawdust
Related Posts