DIY Kitchen Cabinet Refacing: A Comprehensive Guide
When it comes to kitchen renovations, replacing cabinets can be a costly and time-consuming endeavor. However, there's an affordable and efficient alternative: DIY refacing. This process involves resurfacing your existing cabinet frames with a new material, giving your kitchen a fresh look without breaking the bank.
Whether you're new to DIY or a seasoned homeowner, this guide will provide you with the essential aspects of cabinet refacing. From preparation to installation, we'll cover everything you need to know to transform your kitchen with minimal effort and expense.
Materials and Tools
Before you begin, gather the necessary materials and tools for the job. This includes:
- New cabinet doors and drawer fronts
- Veneer or laminate sheets
- Contact cement or wood glue
- Trim router
- Sandpaper (various grits)
- Tape measure
- Level
- Screwdriver
- Hammer
- Clamps
Preparation
Proper preparation is crucial for a successful refacing project. Here's how to prepare your cabinets:
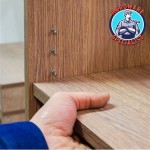
- Remove all hardware, doors, and drawers.
- Clean the cabinet frames thoroughly.
- Sand the frames lightly to create a smooth surface for adhesion.
- If using laminate sheets, cut them to size and apply contact cement or wood glue.
Resurfacing
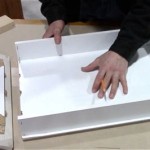
Now it's time to resurface your cabinet frames. If you're using veneer sheets, follow these steps:
- Apply wood glue to the back of the veneer sheets.
- Align the sheets with the cabinet frames and carefully press them into place.
- Use clamps to hold the sheets securely until the glue dries.
If you're using laminate sheets with adhesive backing, simply peel off the release paper and press the sheets onto the cabinet frames.
Installation
Once the cabinet frames are resurfaced, it's time to install the new doors and drawers. Here's how:
- Align the doors and drawers with the cabinet frames.
- Drill pilot holes for the screws.
- Use screws to secure the doors and drawers.
- Attach the hardware.
Finishing Touches
To complete your refacing project, add finishing touches such as:
- Applying a clear finish to protect the new surfaces.
- Updating the cabinet handles and knobs.
- Adding decorative molding or trim.
Conclusion
DIY kitchen cabinet refacing is a cost-effective and rewarding way to update your kitchen. By following these essential steps, you can transform your cabinets into a stylish and practical centerpiece. Remember to take your time, prepare properly, and be patient throughout the process. With a little effort, you can enjoy a beautifully renovated kitchen without the high cost of replacement.

Painted Furniture Ideas Diy Refacing Kitchen Cabinets

Diy Cabinet Refacing Budget Friendly Made Easy Wisewood

Diy Cabinet Refacing Budget Friendly Made Easy Wisewood

Cabinet Refacing Ideas Diy Projects Craft How To S For Home Decor With

Cabinet Refacing Ideas Diy Projects Craft How To S For Home Decor With Kitchen Remodel Small Remodeling Cabinets

Diy Kitchen Cabinets Makeover How To Install New Cabinet Glass Inserts

Reface Your Kitchen Cabinets Easy Diy Remodel

Kitchen Cabinet Refacing The Happy Housewife Home Management

How To Resurface Kitchen Cabinets 2024 Guide Forbes Home

Kitchen Cabinet Refacing How To Redo Cabinets
Related Posts