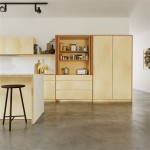
Painting Oak Kitchen Cabinets With Chalk Paint: A Comprehensive Guide
Transforming your kitchen cabinets with chalk paint is a budget-friendly and rewarding DIY project. Oak cabinets, known for their durability and classic appearance, are an excellent choice for this makeover. Here's a comprehensive guide to help you navigate the process seamlessly:
Preparation: The Key to a Successful Transformation
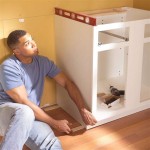
Before applying the chalk paint, thorough preparation is crucial. Begin by removing all hardware, including knobs, handles, and hinges. Next, thoroughly clean the cabinets using a degreaser to remove any grease or grime. This step ensures proper paint adhesion.
Sanding: Creating the Perfect Surface
Sanding the cabinets helps roughen the oak surface, promoting the paint's adherence. Use a fine-grit sandpaper (120 or higher) to gently sand the entire cabinet, including the corners and edges. Remove any sanding dust with a vacuum or damp cloth.
Priming for Optimal Adhesion (Optional)
Priming the cabinets before painting is optional, but it can significantly enhance the paint's adhesion and durability. Choose a primer specifically designed for oak or chalk paint. Apply it evenly and allow it to dry thoroughly according to the manufacturer's instructions.
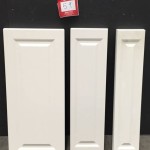
Applying the Chalk Paint: Bring Color to Your Cabinets
Stir the chalk paint thoroughly and apply a thin, even coat using a paintbrush. Start with the inside of the cabinets and work your way out. Be patient and allow each coat to dry completely before applying the next. Depending on the desired opacity, you may need to apply multiple coats.
Distressing and Antiquing (Optional)
To create an aged or distressed look, lightly sand certain areas of the cabinets once the chalk paint has dried. This technique highlights the natural grain of the oak and adds a touch of character. You can also use a dark wax or stain to accentuate the details and create an antique effect.
Hardware Installation: The Finishing Touch
Once the paint is completely dry, reattach the hardware. Choose knobs and handles that complement the new finish and enhance the overall aesthetic of your kitchen. Adjust the hinges and drawer slides as necessary to ensure smooth operation.
Additional Tips for Success:
- Use a high-quality chalk paint brand for superior coverage and durability.
- Test the paint on a discreet area before applying it to the entire cabinet.
- Allow ample drying time between coats to prevent cracking or peeling.
- Consider using a polyurethane finish or topcoat to protect the paint and enhance its longevity.
- Enjoy the transformation of your kitchen cabinets and the satisfaction of a successful DIY project.

Painting Kitchen Cabinets With Chalk Paint Simply Today Life

Chalk Painted Kitchen Cabinets 2 Years Later Our Storied Home

Why I Repainted My Chalk Painted Cabinets Sincerely Sara D Home Decor Diy Projects

Why I Repainted My Chalk Painted Cabinets Sincerely Sara D Home Decor Diy Projects

Chalk Painted Kitchen Cabinets 2 Years Later Our Storied Home

Painting Kitchen Cabinets With Chalk Paint Simply Today Life

Kitchen Cabinet Makeover With Chalk Paint Decorative By Annie Sloan

Painting Cabinets With Chalk Paint Is So Easy Leap Of Faith Crafting

Painting Over Oak Cabinets Without Sanding Or Priming Hometalk

How 500 And Some Chalk Paint Totally Transformed This Kitchen
Related Posts