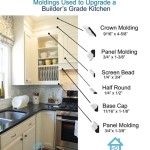
How to Install Crown Molding on Kitchen Cabinets with Soffits
Installing crown molding on kitchen cabinets with soffits adds a touch of elegance and sophistication to any kitchen. While it may seem like a daunting task, with careful planning and the right tools, it's a project that can be completed by even novice DIYers.
Materials You'll Need:
* Crown molding * Miter saw * Measuring tape * Pencil * Level * Brad nailer and nails * Caulk * Spackling compound * SandpaperInstructions:
1. Measure and Cut the Molding:
* Measure the length of the cabinet run, including any soffits. Add an extra inch for overlap at the corners. * Cut the molding to length using a miter saw, ensuring a 45-degree angle on both ends. * Use a miter saw to cut the molding for the soffits at a 45-degree angle on one side only.2. Prepare the Surface:
* Wipe down the surface of the cabinets and soffits to remove any dust or debris. * Use a level to ensure that the soffit surface is level. If not, shim the soffit as needed to create a level surface.3. Attach the Molding to the Cabinets:
* Apply adhesive to the back of the molding that will be against the cabinets. * Press the molding firmly against the cabinets and nail it into place using a brad nailer. * Space the nails evenly along the length of the molding, approximately every 8-12 inches.4. Attach the Molding to the Soffits:
* Apply adhesive to the back of the molding that will be against the soffits. * Press the molding firmly against the soffits and nail it into place using a brad nailer. * Start nailing in the center and work your way out to the edges.5. Create Inside Corners:
* Cut a 45-degree angle on both ends of two pieces of molding. * Place the two pieces together to form a 90-degree angle and nail them into place. * Slide the inside corner piece into place and nail it into the soffit.6. Create Outside Corners:
* Cut a 45-degree angle on one end of two pieces of molding. * Place the two pieces together to form a 90-degree angle. * Position the outside corner piece on the soffit and nail it into place.7. Caulk and Spackle:
* Apply caulk to fill any gaps between the molding and the cabinets or soffits. * Smooth the caulk with a damp rag or your finger. * Fill any nail holes or gaps with spackling compound. * Allow the caulk and spackling compound to dry completely.8. Sand and Paint:
* Once the caulk and spackling compound are dry, sand them lightly to create a smooth surface. * Paint the molding to match the cabinets or any desired color.
4 Ways To Use Crown Molding In Your Home Korth Shannahan Painting And Carpentry

Diy Kitchen Soffit Makeover How To Disguise A Average But Inspired

Diy Kitchen Soffit Makeover How To Disguise A Average But Inspired

Kitchen Makeover On A Budget Update

Kitchen Makeover On A Budget Update

How To Enclose The Space Above Kitchen Cabinets Angela Marie Made

Diy Kitchen Soffit Makeover How To Disguise A Average But Inspired

Diy Kitchen Soffit Makeover How To Disguise A Average But Inspired

Soffit Filler Moulding Aristokraft Cabinetry Kitchen Crown Molding Cabinet

Diy Kitchen Soffit Makeover How To Disguise A Average But Inspired
Related Posts


