Refinishing Kitchen Cabinet Doors: A Comprehensive Guide
Upgrading your kitchen's aesthetics doesn't always necessitate a complete overhaul. Refinishing kitchen cabinet doors can be a cost-effective and transformative solution, restoring their beauty and functionality without breaking the bank. Here's a comprehensive guide to help you achieve stunning results.
1. Preparation is Key
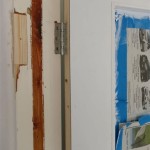
Before diving into the refinishing process, proper preparation is essential. Remove all doors and hardware, clean them thoroughly with a degreaser, and let them dry completely. Protect your work area with drop cloths and ensure adequate ventilation.
2. Sanding for a Smooth Finish
Sanding is crucial for creating a smooth surface for painting or staining. Use an orbital sander with fine-grit sandpaper (120-150 grit) to remove any imperfections. Sand with the grain of the wood and gradually work your way to finer grits.
3. Cleaning and Repairing
After sanding, clean the doors with a tack cloth to remove any dust and debris. Inspect for any damage, such as dents or scratches, and repair them using wood filler or a similar product. Allow ample time for the repairs to dry.
4. Paint or Stain? The Choice is Yours
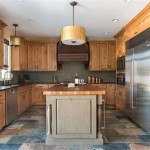
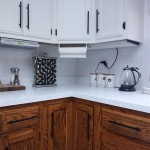
Depending on the desired look and current condition of the doors, choose either paint or stain. Paint offers a wide range of colors and finishes, while stain preserves the natural grain of the wood. Consider the overall kitchen style and other elements when making your selection.
5. Prime Time
Before applying paint or stain, prime the doors with a high-quality primer. Primer provides a base coat that promotes paint adhesion and improves overall coverage. Allow the primer to dry completely before proceeding.
6. Paint Application: Precision and Technique
If painting, use a high-quality brush or roller and apply thin, even coats. Allow each coat to dry thoroughly before applying the next. For a smooth finish, lightly sand between coats with fine-grit sandpaper (220-240 grit).
7. Stain Enhancement: Bringing Out the Grain
For staining, apply a thin coat using a brush or sponge. Use a clean cloth to wipe away excess stain and reveal the wood grain. Allow the stain to penetrate and dry before applying additional coats if desired.
8. Protect Your Masterpiece: Seal It Up
Once the paint or stain is dry, apply a clear protective finish to shield the doors from wear and tear. Choose a sealant that is compatible with the finish you used and apply it evenly using a brush or roller. Allow the sealant to dry completely.
9. Reinstall Hardware and Admire Your Work
Reinstall the hardware, hinges, and doors back into place. Stand back and admire the transformed look of your kitchen cabinet doors. Your hard work and attention to detail will pay off in a beautiful and updated kitchen space.
Remember:
- Use proper safety equipment, such as gloves and a mask, throughout the process.
- Allow ample time for each step to ensure optimal results.
- If in doubt, consult with a professional refinisher for guidance or assistance.

How To Paint Kitchen Cabinets In 7 Simple Steps

How To Refinish Cabinets Like A Pro

Best Kitchen Cabinet Refacing For Your Home The Depot

20 Diy Cabinet Door Makeovers With Furniture Stencils Makeover Doors Cabinets
:strip_icc()/painted-kitchen-cabinet-ideas-20-becca-interiors-southampton-0b04a571a07649deb33edae1e89d9c41.jpeg?strip=all "29 Painted Kitchen Cabinet Ideas You Can Easily Copy")
29 Painted Kitchen Cabinet Ideas You Can Easily Copy

Kitchen Cabinet Refacing Options And Tips
:strip_icc()/101683281-fdc75c2d5aed42f2b3cd3f270f1a037c.jpg?strip=all "23 Stylish Ideas For Kitchen Cabinet Doors")
23 Stylish Ideas For Kitchen Cabinet Doors
:max_bytes(150000):strip_icc()/DearLillieCabinets-5c64643b46e0fb0001f090ca.jpg?strip=all "30 Painted Kitchen Cabinet Ideas")
30 Painted Kitchen Cabinet Ideas

15 Best Painted Kitchen Cabinets Ideas For Transforming Your With Color

Refinishing Kitchen Cabinets Modern Refacing Made Easy Wisewood
Related Posts