Staining Kitchen Cabinets Espresso: A Comprehensive Guide
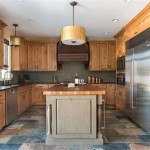
Transforming the look of your kitchen cabinets with an espresso stain can give your space a dramatic and sophisticated upgrade. This timeless and versatile color complements a wide range of kitchen styles, from traditional to contemporary. Achieving a flawless espresso stain requires careful preparation, high-quality materials, and proper application techniques. Here's a comprehensive guide on how to stain kitchen cabinets espresso with ease and precision:
1. Preparation is Key
Before applying the stain, it's crucial to prepare the cabinets thoroughly. Remove all hardware, such as hinges and knobs, and clean the surfaces with a degreaser. Use a fine-grit sandpaper to lightly sand the cabinet doors and drawers to create a smooth surface for the stain to adhere to. Wipe away any dust or debris with a tack cloth.
2. Choosing the Right Stain
Selecting the perfect espresso stain is essential to achieve the desired color and finish. Opt for high-quality stains that are specifically designed for kitchen cabinets. Test the stain on an inconspicuous area before applying it to the entire surface to ensure you're happy with the color. Remember that the color of the stain may vary slightly depending on the type of wood and its natural grain.
3. Applying the Espresso Stain
Apply the espresso stain using a clean brush or foam applicator. Work in small sections to avoid streaks or unevenness. Spread the stain evenly over the surface, following the direction of the wood grain. Allow the stain to penetrate for the recommended amount of time stated on the product's instructions. Wipe off any excess stain with a clean cloth and let the cabinets dry completely.
4. Seal the Stain for Durability
Once the stain has dried, protect the finish by applying a clear protective sealant. Polyurethane is a common choice as it provides a durable and glossy finish. Apply one or two coats of polyurethane, following the product's instructions for drying times between coats. This will enhance the longevity of the stain and make the cabinets more resistant to moisture and wear and tear.
5. Reassemble and Admire
After the sealant has cured, reassemble the cabinets by attaching the hardware you removed earlier. Step back and admire the stunning transformation! Your kitchen cabinets now boast a rich espresso stain that adds depth, sophistication, and timeless beauty to your space. Enjoy the refreshed look and feel of your upgraded kitchen.

Which Types Of Wood Look Best With Espresso Stain

Test Staining Oak Cabinets Espresso Brown Merrypad

Test Staining Oak Cabinets Espresso Brown Merrypad

Staining Oak Cabinets An Espresso Color Diy Tutorial Monica Benavidez

Espresso Kitchen Cabinets S Ideas Tips From

Builders Mark Cabinets From Wolf Home S In Espresso Stain

Staining Oak Cabinets An Espresso Color Diy Tutorial Cost Of Kitchen Home Kitchens

Deputy Son Red Oak With Espresso Stained Kitchen Sylvester Cabinetry

Staining Oak Cabinets An Espresso Finish Faq S Monica Benavidez

Staining Your Wood Cabinets Darker Young House Love
Related Posts