How to Gel Stain Kitchen Cabinets
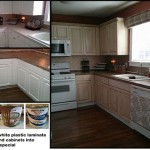
Gel staining kitchen cabinets is an excellent way to update your kitchen without breaking the bank. Gel stains are easy to use, provide a smooth, even finish, and are less messy than traditional stains.
Materials You'll Need:
- Gel cabinet stain in your desired color
- Clean rags or cloths
- Foam brushes or daubers
- Nitrile gloves
- Stirring stick
- Mineral spirits (for cleanup)
- Sandpaper or sanding sponge (optional)
- Polyurethane or other finish
Step-by-Step Instructions:
1. Prepare the cabinets:
- Remove all hardware, including knobs, handles, and hinges.
- Clean the cabinet surfaces thoroughly with a damp cloth.
- (Optional) For a smoother finish, lightly sand the cabinet surfaces with fine-grit sandpaper or a sanding sponge.
2. Stir the gel stain:
3. Apply the gel stain:
4. Allow the gel stain to penetrate:
5. Wipe off excess stain:
6. Repeat steps 3-5 for additional coats:
7. Seal the cabinets:
8. Reattach the hardware:
Tips:
- Test the gel stain on an inconspicuous area first to ensure you're happy with the color and finish.
- Use a light touch when applying the gel stain to avoid streaks or runs.
- If you get gel stain on your skin, wipe it off with mineral spirits immediately.
- Allow the gel stain to dry completely before applying a finish to prevent discoloration.
- Gel stains can be layered to create unique effects. Experiment with different colors and application techniques.

10 Best Gel Stain Tips For Beginners Budgeting Bliss

Gel Stain Kitchen Cabinets Without Sanding Fast Easy Diy

How To Gel Stain Cabinets Printable She Buys He Builds

Gel Staining Kitchen Cabinets 6 Month Review Merrypad

Vintage Refined Gel Staining Kitchen Cabinets

Java Gel Stain Kitchen Transformation General Finishes Design Center

Gel Staining Kitchen Cabinets 6 Month Review Merrypad

The Creative Cubby Diy Gel Stain Cabinet Makeover

Pickled Oak Bathroom Vanity Before And After Gel Stain Staining Cabinets Kitchen Makeover Wood

Entire House Cabinet Makeover For Under 200
Related Posts