How to Update 1960s Kitchen Cabinets: A Step-by-Step Guide
Updating 1960s kitchen cabinets can transform the heart of your home without a complete remodel. By following these steps, you can breathe new life into these classic pieces while maintaining their retro charm.
Step 1: Assess and Plan
Take stock of your cabinets' condition and style. Determine if they are structurally sound or require repairs. Decide on the desired look, whether it's a modern refresh or a vintage restoration.
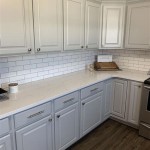
Step 2: Paint or Reface
Painting your cabinets is a cost-effective way to update their appearance. Choose a color that complements your kitchen's style and décor. Alternatively, you can reface the cabinets, which involves replacing the doors and drawer fronts with new ones.
Step 3: Update Hardware
Replace the old knobs and pulls with modern or classic hardware. This small change can instantly update the cabinets' look and feel. Choose hardware that complements your paint color or adds a touch of contrast.
Step 4: Add Decorative Trim
Enhance the cabinets' design with decorative trim, such as molding or corbels. These elements can add depth and character to the cabinets, giving them a more custom look.
Step 5: Install Backsplash
A new backsplash can create a focal point and complement the updated cabinets. Consider using tiles, mosaic, or glass for a stylish and durable addition to your kitchen.
Step 6: Add Lighting
Proper lighting can illuminate the cabinets and create a more inviting atmosphere. Install under-cabinet lighting or pendant lights to highlight the updated features and increase functionality.
Tips for Maintaining Appeal:
To preserve the updated look of your 1960s kitchen cabinets, follow these tips:
- Clean cabinets regularly with a mild detergent and water.
- Avoid using harsh chemicals or abrasive cleaners on the finish.
- Inspect hardware periodically for any loose screws or damage.
- Consider adding a protective coating to the cabinets to protect them from wear and tear.
By following these steps and incorporating these maintenance tips, you can breathe new life into your 1960s kitchen cabinets, creating a stylish and functional space that blends retro charm with modern aesthetics.

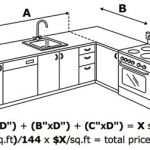
1960 S Kitchen Remodel Plans The Stonybrook House

Updated 1960 S Kitchen Reveal Little Vintage Cottage

Updated 1960 S Kitchen Reveal Little Vintage Cottage

1960 S Kitchen Makeover Remodel Before And After Hardwood Flooring Painted White Cabinets Diy

Before After A Dark 1960s Kitchen Gets Bright 185 Facelift Remodeling Projects Remodel
:strip_icc()/97254230_167698388039805_3219216841560390430_n-794c52725d9d420b9022143c72e741b9.jpg?strip=all "14 1960s Kitchen Ideas We Still Love Today")
14 1960s Kitchen Ideas We Still Love Today

1960 S Kitchen Remodel Plans The Stonybrook House

Flip House 1960s Kitchen Before And After A Major Renovation Ranch Remodel Plans Inexpensive

Renovate Or Update Mid Century 1960 Kitchen

1960 S Kitchen Gets A Dramatic Makeover Cabinets Flooring 1960s Remodel
Related Posts