Adding Crown Molding to Kitchen Cabinets: A Guide to Enhance Style and Value
Crown molding, an elegant architectural element, can elevate the sophistication of your kitchen cabinets and add a touch of grandeur. Adding crown molding is a relatively simple and rewarding improvement project that can significantly transform the aesthetics of your kitchen space. This guide provides comprehensive instructions for a successful crown molding installation on your kitchen cabinets.
1. Materials and Tools
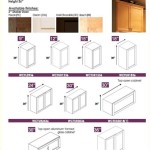
Before beginning, gather the necessary materials: crown molding, miter saw or miter box, measuring tape, pencil, wood filler, caulk, finishing nails, nail gun or hammer, and a ladder. Ensure you have appropriate safety gear, including safety glasses and gloves.
2. Measurements and Angles
First, measure the length of the cabinet tops where the crown molding will be installed. Cut the molding to the desired lengths using a miter saw or miter box, ensuring 45-degree miter cuts for the corners. Dry fit the molding to ensure a precise fit and make any necessary adjustments.
3. Installation
Applying a bead of wood filler to the miter joints will conceal any gaps and reinforce the corners. Allow it to dry and sand it smooth. Attach the crown molding to the cabinets using finishing nails or a nail gun. Countersink the nails slightly below the surface of the molding for a seamless finish.
4. Caulking and Finishing
To seal any remaining gaps and create a polished look, apply a thin bead of caulk along the joints and nail holes. Wipe away excess caulk with a damp cloth. Finally, paint or stain the crown molding to match your kitchen decor and allow it to dry thoroughly.
5. Finishing Touches
Once the paint or stain is dry, attach any decorative elements, such as corner blocks or rope molding, to further enhance the visual appeal of the crown molding. These accents can add depth and character to your kitchen cabinets.
Additional Tips
For optimal results, consider the following tips:
- Use high-quality materials to ensure longevity and durability.
- Practice your miter cuts on scrap pieces before cutting the actual molding.
- Dry fit the molding meticulously to eliminate any potential alignment issues.
- Allow ample drying time for the wood filler, caulk, and paint or stain.
- Protect the finished molding from accidental damage during installation and use.

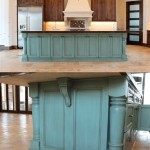
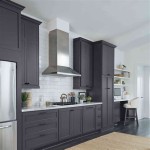
Diy Kitchen Cabinet Upgrade With Paint And Crown Molding

Adding Crown Molding To Kitchen Cabinets Young House Love

How To Add Crown Molding Kitchen Cabinets Abby Organizes

How To Add Crown Molding Kitchen Cabinets Abby Organizes

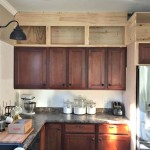
Adding Height To The Kitchen Cabinets Tempting Thyme

Adding Moldings To Your Kitchen Cabinets Remodelando La Casa

Adding Height To The Kitchen Cabinets Tempting Thyme

Diy Kitchen Cabinet Upgrade With Paint And Crown Molding

Adding Crown Moulding To Wall Kitchen Cabinets Momplex Vanilla Ana White

Adding Kitchen Cabinet Moulding To Existing Cupboards Molding Crown
Related Posts