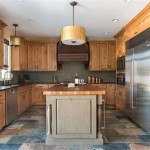
Adding Crown Molding to Existing Kitchen Cabinets: A DIY Guide
Crown molding is an elegant and sophisticated architectural detail that can add a touch of sophistication to any kitchen. It's a great way to update the look of your existing cabinets without having to replace them entirely. Adding crown molding is a relatively simple DIY project that can be completed in a few hours with the right tools and materials.
Materials You'll Need
Before you get started, you'll need to gather the following materials:
- Crown molding (enough to cover the perimeter of your cabinets)
- Miter saw
- Carpenter's glue
- Brad nailer
- Finish nails
- Caulk
- Paintable caulk
- Sandpaper
- Paint (if desired)
Step-by-Step Instructions
Once you have all of your materials, you're ready to start adding crown molding to your cabinets.
- Measure and cut the crown molding. Measure the length of the cabinet you're adding the crown molding to and cut the molding to size using a miter saw. Be sure to cut the molding at a 45-degree angle so that it fits together properly.
- Attach the crown molding to the cabinet. Apply a bead of carpenter's glue to the back of the molding and press it into place on the cabinet. Use a brad nailer to secure the molding to the cabinet. Be sure to drive the nails into the molding at an angle so that they're not visible from the front.
- Fill the nail holes and gaps. Use caulk to fill any nail holes or gaps between the molding and the cabinet. Smooth the caulk with your finger or a putty knife. Once the caulk has dried, sand it smooth.
- Paint the crown molding (optional). If you want to paint the crown molding, use a paintbrush or roller to apply a coat of paint. Allow the paint to dry completely before using the cabinets.
Tips for Adding Crown Molding
Here are a few tips for adding crown molding to your kitchen cabinets:
- Use a miter saw to cut the molding at a 45-degree angle. This will ensure that the molding fits together properly.
- Apply a bead of carpenter's glue to the back of the molding before attaching it to the cabinet. This will help to hold the molding in place.
- Use a brad nailer to secure the molding to the cabinet. Be sure to drive the nails into the molding at an angle so that they're not visible from the front.
- Fill any nail holes or gaps between the molding and the cabinet with caulk. Smooth the caulk with your finger or a putty knife.
- If you want to paint the crown molding, use a paintbrush or roller to apply a coat of paint. Allow the paint to dry completely before using the cabinets.
Conclusion
Adding crown molding to your kitchen cabinets is a relatively simple DIY project that can add a touch of sophistication to your kitchen. By following these tips, you can easily complete this project in a few hours.

How To Install Crown Molding On Cabinets Young House Love

Adding Kitchen Cabinet Moulding To Existing Cupboards Molding Crown Cabinets

How To Install Crown Molding On Cabinets Young House Love

Crown Moulding The Recently Rediscovered Kitchen Solution

My Designer Secret For Updating Old Kitchen Cabinets Maria Killam

Kitchen Update Extend Cabinets To Ceiling Emily S Project List

How To Install Crown Molding On Cabinets Young House Love

Extending Kitchen Cabinets To Ceiling American Wood Reface

11 Kitchen Cabinet Crown Molding Ideas For Your

Diy Kitchen Cabinet Upgrade With Paint And Crown Molding
Related Posts